This quick and easy guide to handstamping metal might just spark a burst of creativity in you…. Handstamping is so much fun and you can get as creative as your imagination will take you. So, if you’re just getting started in metal handstamping, have wondered how to get started or just wondered how we at MurrayandMe Jewellery personalise your jewellery using the handstamping technique have a little read of the below…

I started my business quite literally on my dining room table with a simple handstamping jewellery kit I put together with items purchased online and a hammer from B&Q. Here’s a run down of the basic tools you’ll need to get started…

Handstamping tool list
-
Letter/Number Steel Stamping set
-
Metal Blanks and/or practice sheet
-
Brass Hammer (1-2 lbs)
-
Steel Bench Block
-
Leather Sandbag (for noise reduction)
-
ImpressArt Stamp Straight Tape (optional)
Ok, so first things first. Your Set-up
Sit comfortably! Place your steel stamping block on top of your leather sand bag. The steel block offers a nice firm surface for your metal blanks or practice sheet. You’ll get a much cleaner and more defined impression than on a softer surface. Handstamping can be loud so the leather sandbag helps with noise reduction and absorbs the blow from the hammer hitting the steel letter stamps.
Take your letter/number sets and select the stamps that will make up your name/ phrase/ date. Lay them out next to your stamping block in the correct order to form each word.

Top tip. Make sure they’re all facing up so you can see each letter (“s”) on the shank of the stamp. Trust me there is nothing more frustrating than stamping a letter sideways or upside down.
Some of the cheaper letter/ number sets don't have the letters marked on the side of each stamp so make sure you buy the sets that do. It’s worth paying alittle extra for.
Now, lets get stamping.
A nice heavy hammer will make it easier to get a clean strike leaving a clear impression. I recommend a 1- 2lb hammer. In the MurrayandMe studio we use 2lb brass hammers. Brass is fairly soft to it won’t damage the ends of your steel letter/ number stamps. Instead the stamps will leave indentations on your brass hammer so be prepared to replace it after a lot of use.

Now, handstamping metal is tricky, and it does takes practice to get your personalisation beautifully aligned with consistent depth in the indentation and spacing between letters but you’ll get there. It will never be perfect but that’s the beauty of handstamping.


Before handstamping on your stamping blanks, buy some practice sheet first. Aluminum is fairly inexpensive and it’s a great way to practice your technique and the words/ names or phrases you’ll be stamping before going straight onto the real thing.
Place your letter stamp, with the letters flat against the blank or practice sheet and use your hammer to gently strike the top of your letter stamp, followed by a firmer, harder strike. The gentle strike will leave a light impression and give you a feel for the placement and how to strike again on the second hit.
Top tip If you go in with a heavy strike from the get go, it may result in a ghost impression- where your letter stamp jumps and leaves a double impression. With a little practice and as you grow in confidence, you can increase the force you strike the stamp with 1st time. Eventually you’ll only need to strike the stamp once.

Now it's worth noting, There are a few tricky stamps which you may need to apply a ‘tilt and tap’ technique too. This is needed when the top/ bottom or sides of the stamp are hard to imprint with a single hammer strike. If this is the case, place the stamp on your blank or practice sheet and tilt the stamp, gentle taps only at this stage so you don’t displace the rest of the impression.
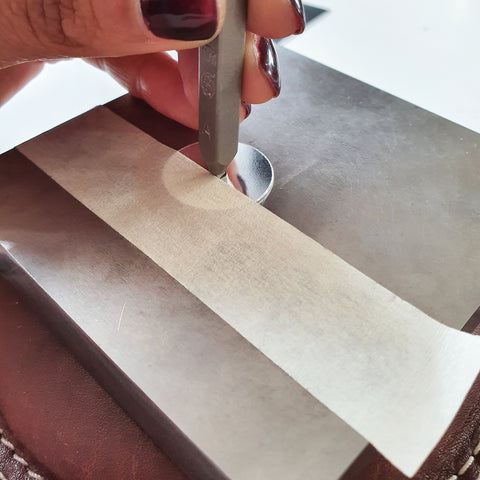
If you need a little help with alignment, try using the ImpressArt Stamp Straight tape (or masking tape). Place your blank on your stamping block and tape it down onto the metal block alittle below where you would like your personalisation to be. Gently slide your letter stamp down the surface of your piece of metal until you feel the bottom edge of the stamp design touch on the tape. Stop there. Strike the stamp with hammer gently at first and harder the second time. Alignment takes a lot of practice so don't get discouraged!
Another tip to get perfect alignment is to get the surface of your metal highly polished first. We use this technique in the MurrayandMe Studio but it can be done at home too. Using these microabrasive polishing pads. Gently rub the surface of metal with the micro abrasive polishing pad (it will turn black, that’s ok). You’ll be sure to see a nice shine on your metal, so much so that you can use the metal as a mirror to see the reflection of the letter stamp. You’ll be able to see exactly where to place the letter on the metal helping you to find a nice accurate impression
A note on Letter sets
Every letter set is different. Don’t assume that ever letter is central on the stamp- they’re not. For example, one of my stamping sets I know I have to rotate my ‘L’ stamp slightly to the right so when I strike it the letter is central. Ultimately you have to know each letter in your stamping set.
Follow me on Instagram to watch the handstamping technique in action... @murrayandme_jewellery


0 comments